*Thrifty Living * Homeschooling * Natural Living * Creating * Baking * Learning * Exploring * Subscription Boxes * Childhood Cancer* Death of a Child*


Showing posts with label health. Show all posts

Tuesday, March 27, 2018

Courage for the Unknown Season

Isn't it funny how God works, and gives us His messages at the exact perfect time? I had been remarking to a friend that with my youngest turning 5 years old soon and my oldest a teen that I was embarking upon a new season of life and it just felt "strange". That very night I picked a book from the top of my "to read" pile and it was Courage for the Unknown Season by Jan Silvious. It was perfect reading material at the perfect time.

We all have seasons of life and sometimes it can be a little scary navigating the unknown, but this book shows us how to do it with confidence and hope. From just the unknowns to big life changes that we didn't ask for, Silvious shows us that God shines brightest during those times of turmoil.

I gleaned a lot of wisdom from this book and will be keeping it on my shelves (which you know is a high honor in this house - only the best stay!).

This book was given to me by Tyndale Publishing in exchange for my honest review.

Tuesday, March 8, 2016

Sicko

We've had a yucky cold making it's rounds through the house for a good month and it finally set up residence in me. I think it's the same strain that made my brother progress into pneumonia so I've been trying to take it easy around here.

Saturday I spent most of the day in bed with some good books and a lot of rest. I'm so thankful that my husband was home and steered the kids clear of the bedroom. He even had some 7-UP and my favorite treat waiting for me once I got up. 

Sunday dawned a beautiful spring-like day so I managed to settle myself on the porch while the kids played in the yard and salvaged enough energy to get some seeds started indoors.

Yesterday was more time spent outdoors and a burst of energy at 10:30 at night found me deep cleaning the kitchen.

Today it's Amy and I with runny noses and myself with a sinus pressure headache. We've been lucky this winter though as it's really been our only full blown yucky sickness and we're getting over it slowly but surely.
 

Friday, February 12, 2016

Essential Oils

Essential Oils have been the rage for several years now. While the "hippies" have been using them for decades, the rise in popularity really started when the multi-level marketing companies Young Living and doTerra oils were founded. All of a sudden my Facebook feed was filled with sales pitches and advertisements but guess what...those oils are expensive!! Multi-level marketing always is - because the company is selling the oils and paying the marketers as well.

You can get pure essential oils at a reasonable price. I googled and researched and finally settled upon Plant Therapy oils, which are high quality oils at a great price (this is not a paid endorsement for them!). 
I'm learning my way with oils and will share along the way with ways that I'm finding them useful. The oil I am most familiar with is Tea Tree oil. It's a great disinfectant so can be used in most household cleaners. It's also great for teenage skin or anyone who has troublesome blemishes. My new favorite recipe is Natural Toilet Bowl cleaner. 
 
All you need is:
1/2 c. baking soda
1/4 c. distilled white vinegar
10 drops of Tea Tree Oil

I pour the baking soda in the toilet bowl, add the drops of the oil, then pour the vinegar in. I shut the lid as it fizzes and cleans and about 10 minutes later go back to scrub and swish the bowl and flush. It leaves a sparkly bowl which is disinfected. 

If you have a lot of lime build up in your bowl you will need to deeply scrub the first time around, or even use a pumice stone. But after getting it sparkling the above recipe will take care of your toilet bowl if you use it on a weekly basis! 

Tuesday, September 15, 2015

Naturally

I'm a big believer in trying natural products before going to pharmaceuticals. Don't get me wrong, there is a time and a place for picking up medicine at the pharmacy counter and I am glad that we have that option. But I also believe that God created natural plants that can often do the same, with less side effects, and I try to scope those out first.

I'm not a doctor though and do not suggest going off a medicine or trying a new supplement without talking to your doctor and doing your research first.

This is just what works for our family.

We always have a jar (or two) of Elderberry Syrup on hand. This really boosts your immune system and is especially helpful during the flu season.

My mother calls Activated Charcoal magic. I don't know how many times I've turned to this for stomach upsets, nausea, and more. There have been times that I have been *this* close to throwing up, I take one or two tablets, and within 15 minutes I can literally feel it absorbing the acid in my stomach.

On an added note. If you break open a tablet, pour it on a toothbrush, and brush your teeth with it you will notice a much whiter smile within a week (after rinsing out your black mouth!). 


Carditone has been a life saver for my husband. This summer his blood pressure was through the roof. Before going to the doctor and going on blood pressure pills for life we decided to try some supplements. He takes Carditone every other day and garlic, magnesium, and CQ10 every day. His counts have come down almost 50 points into the normal range and are staying that way!

These are just a few of the products that we use and have in the medicine cabinet. I'll highlight others throughout the next few months.
 

Friday, July 24, 2015

Fresh

Being gone for 5 days in July means returning to a bounty in the garden (as well as a bounty of weeds!). 

It's amazing just how quickly things can grow and change in the garden.
Look at the giant cucumber! It was as long as Amy's legs! It actually still tasted good too, no bitterness or giant seeds in it.

One night I tried to make as much of our meal out of the garden as possible. I ended up with:

*Open face bagel sandwiches. They were whole wheat bagels, a slice of tomato (from the garden), bacon, and cheese.
*Green beans and onions (from the garden) and bacon

*Cucumber and green pepper (from the garden) salad

*Strawberries

That is a summertime meal! Yummy! 

Friday, June 5, 2015

Nature Heals

The past few months my face has broken out horribly, especially on the chin area. I don't know if it's stress, hormones, bad eating, the heat, or a combination of it all. But it was bad. 

I tried everything in my cabinets. Acne spot cream, the generic form of ProActive, face masks, and more. Nothing worked. My face just got dry and peeled, along with more acne and more redness. This is embarrassing at the age of 32! All those products used to work for me but not this time.

Then I remembered the homemade deodorant in the cupboard.
 Tea tree oil and coconut oil are both powerful antiseptics and healing oils as well. I started to apply this to my face in place of all the other creams and within just a few days I noticed a drastic difference. It's been close to two weeks now and I haven't had new breakouts and the old ones are healing and close to gone! I could do without the baking soda in it (my next batch, solely for the face, with be just the tea tree and coconut oils).

A simple, cost effective beauty routine! If you don't have a source for tea tree oil or coconut oil a good place for both is Swanson Vitamins. I just restocked my supplement and medicine cabinets with several items from there and have always been happy with my orders (as well as the prices!). Use this link for $5 off your first order!  
 

Thursday, March 5, 2015

Fluff Love

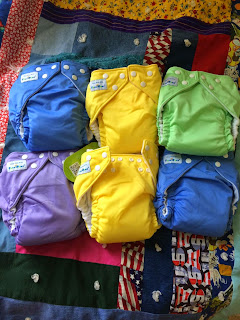
Look at that colorful goodness that arrived in the mail this week!
A few weeks ago Fuzzi Bunz was having a sale on their "imperfect" diapers (as a side note I see nothing out of whack with the diapers so the imperfections must be slight!) and with a code for free shipping and a percentage off I was able to get 6 diapers for $32 shipped. This is an amazing price for brand new cloth diapers. I wish I could have stocked up on more but they were literally selling out as I carted so I had to quickly check out just to be sure I received some!

I'm an on again off again cloth diaper-er. I don't use them in the winter as I don't like to dry them in the dryer. Once the weather starts to warm is when my babies sport the fluffy cloth bums! We don't use them at night typically and when away for the day we use disposables. I have a large basket of diapers that I've picked up on sale as well as at garage sales. Many dating back to when Jacob was a baby (9 years ago!) so it shows you how long they can last. I'll almost be sad when sweet Amy potty trains!  
 

Friday, October 31, 2014

Dandelion Jelly

As I opened up another jar of jelly today I realized that I never shared with you my new discovery this past spring! As dandelions popped up all over my yard in early spring I googled Dandelion Wine (something my Grandma had talked about) and saw that I wouldn't have enough to make that, but stumbled upon dandelion jelly instead.

I was intriqued. It sounded like it would be gross. Yet, all reports I read made it clear that it tastes like honey. I figured I would give it a try.

We picked a huge mixing bowl full of dandelion blossoms (no stems) in an area that is not sprayed or used by animals. I rinsed them and spread them out on a towel on the kitchen counter. Several hours later I separated the yellow petals from the green part (I started by cutting off the base but finally just started to pull the middle out with my fingers which was much faster). Discard all green parts.

Pour enough boiling water over the petals to cover and let sit several hours or overnight. After brewing you will have a yellow colored "dandelion tea". Pour through a strainer lined with a coffee filter into a bowl. Discard the petals as all you are using is the "tea liquid".

You will need: 3 cups dandelion tea, 4 1/2 c. sugar, 2 T. lemon juice, 1 box powdered pectin


Add dandelion tea, lemon juice, 1 box of pectin into a large saucepan. Bring to a boil.  Add your sugar and bring back to a boil.  Continue boiling 1-2 minutes. Remove from heat and fill jars. Process in a hot water bath canner for 10-15 minutes.
 
I think this made about six jars. I am hoarding the last few in the cabinet because it seriously is very delicious! It does taste similar to honey and is great on toast, biscuits, and English Muffins.

Thursday, October 2, 2014

Cut the Sugar!

If you are trying to cut sugar out of your diet you may be miffed by the few, and mostly artificial, products on the market. It's hard to cook, bake, and eat healthy when everything these days seems to be artificial.

Which is why I love NuNatural products and was thrilled to sample and review a few of their new items! 
Their Stevia is 100% natural and best of all is non-bitter (I was turned off by Stevia previously by a very bitter and nasty after taste...NuNatural Stevia does not have this!). There are so many options to choose from too...packets (perfect for coffee or tea or a sprinkle on foods), liquid, powder, and now their simple syrup.
The syrup has become a new favorite in our house, especially the cocoa and cocoa mint. This can be used in so many ways but in our house a quick glass of chocolate milk or an ice cream topping is our favorite use for it. The store bought counter parts are filled with high fructose corn syrup, sugar, artificial flavor, and a bunch of unpronounceable things. I'm going to experiment with this to come up with some awesome baked goodies as well.

The new NuStevia Liquid Extracts are amazing as well! These are actual extracts of lemon, orange, peppermint, cherry, and vanilla! Not only are they easy for flavoring your water (think Crystal Light without the chemicals and colors!), but also other beverages and for all your baking needs. Can you imagine cupcake frosting made with NuStevia Liquid Cherry Vanilla?! Or Christmas mints made from their peppermint liquid?! Poppy seed bread drizzled with an icing made with the orange liquid? 

I've been sampling these products since August and am only at the beginning of my ideas of what to make with these. You can basically transform your snacking, baking, and cooking needs with these sweeteners. Think holiday baking coming up! I hope to showcase some of my future creations on here (yes, I need to get back into posting more recipes!).

You can save 15% on NuNaturals orders by using code BLG1214

4 of you lucky readers can win a Prize Package from NuNaturals just by entering the Rafflecopter below! Each winner will receive: one bottle of the Vanilla Stevia Liquid,  a 50 pkt box of NuStevia White Stevia Powder Packets, PLUS a bottle of NuStevia no carbs blend, and a bottle of cocoa syrup. With a retail value of  $50.00 , plus a free bonus product! Open to readers worldwide; P.O. Boxes not allowed. Come back daily to win, contest ends on October 9th.
    
a Rafflecopter giveaway
  Disclaimer: Products given to me by NuNaturals in exchange for my honest review. Product giveaway supplied by NuNaturals.

Friday, August 29, 2014

100 Days of Real Food

A couple years ago I started following 100 Days of Real Food on Facebook. It was an easy way to see lunch ideas and get some great recipes for our family. I visit their blog occasionally and have pulled some of our favorite recipes from their (the creamy wheat macaroni and cheese is a favorite of my husband's!).

I was thrilled when I heard about their cookbook. And even more excited when they offered me a copy in order to review it! 
100 Days of Real Food by Lisa Leake is more like a Bible for food and healthy eating. The recipes are divine, yet family friendly and easy to make. The pictures are gorgeous (you know I love a cookbook with photos!)
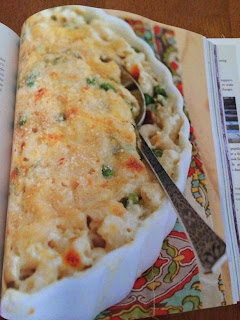
Macaroni Casserole, anyone? (Page 252)
Fall is right around the corner, which means soups and stews! How about some Vegetable Chili? (Page 248)
The lunch box ideas are fantastic, and there are several pages of ideas. Perfect for any lunch, really, not just one away from home!
But it's not just recipes. The first half of the book is about the Leake's own food journey and how to get started on your own road to real food. From "What is Real Food?" to "Making Changes; Don't Overthink, Just Start!" 

There are menu plans based on seasons, what to watch for in food labels, how to shop, snack ideas, and so much more. As a busy mom, with limited time in the kitchen, this is the book on how to change our diet while not having anyone rebel at mealtimes! 

I am thrilled to add this to my bookshelf and see myself using it time and time again. Perfect for all degrees of cooks, the recipes even list the difficulty from easy to advanced.
 

Wednesday, June 25, 2014

The Nourished Kitchen

After a friend got me interested in Weston A. Price I've loved studying his studies and learning more ways to cook this way.

The Nourished Kitchen; Farm-to-Table Recipes for the Traditional Foods Lifestyle by Jennifer McGruther caught my eye. "A traditional foods diet avoids processed ingredients, but allows meat, animal fat, and grains. It embraces cultured dairy, such as kefir and yogurt, that contain beneficial bacteria; fermented foods, such as sauerkraut  and kombucha, that are rich in probiotics; and organ meats that are packed with vitamins and minerals. It also celebrates locally grown foods."

This is a beautiful book. The pictures are stunning and the layout of the recipe book is perfect.

I was a bit disappointed with the majority of the recipes. Even though the ingredients themselves are fairly simple the recipes seem too dramatic, too time consuming, not very child friendly. In a word - just too fancy. There must be a simpler approach to traditional foods (I know there is as the cookbook Nourishing Traditions is one).

Though I may not use this book for the recipes, I will be keeping it on my shelves for the reference aspect of the book. Jennifer gives a lot of information about a traditional diet and how to incorporate whole foods and healthy fats into your cooking. Fermenting, whole grains, etc. are all covered in this cookbook so it is a wealth of information. For this alone I recommend the book. There are a few recipes that I do want to try out that may turn into staples in our home. :)

Disclaimer: This book was given to me by Blogging for Books in exchange for my honest opinion.   
 

Wednesday, June 11, 2014

Snack Girl to the Rescue!

I've never heard of the popular blog, Snack Girl, before but was quite interested in this cookbook when I read about it. Snack Girl to the Rescue! by Lisa Cain is filled with "easy, delicious food for breakfast, lunch & dinner". 100 recipes under 400 calories.

I must not have read the description well because for some reason I assumed this was a cookbook of snacks. I was happy to find actual meal ideas within the pages. I also enjoyed the fact that the first third of the book is more about healthy eating, healthy shopping, and healthy ideas. I love to "read" cookbooks so was thrilled that this book has a little 'meat' to it, rather than just recipes.

The recipes themselves look simple, filling, and like something my family would actually eat. Not to mention pretty frugal. All these make it a win in my book. I'm especially excited about the crockpot recipes as well as the overnight breakfasts (is anyone else not a morning person? I'm excited that I can whip up some batter the night before and just bake it the next morning).

My only complaint is that there are no pictures whatsoever. This is more of a simplistic cookbook that gets down to the nitty gritty. I'm assuming that since these recipes were originally on her blog that you are able to find pictures of the foods there. But I do like my cookbooks with some pictures.

Overall a great cookbook for simple, healthy meal ideas and I'll be sure to give these recipes a try!

Disclaimer: I received this book from Blogging for Books in exchange for my honest review.  

Saturday, December 7, 2013

Trim Healthy Mama Kai Si Ming

I'm still trying recipes from the book Trim Healthy Mama, though I really need to get back into using the plan daily. One recipe that we all love turns out to be a very quick and very inexpensive dish. It is an "S" meal (Satisfying) and there is enough for supper and leftovers for lunch. 
Kai Si Ming

Brown 3 lbs. ground beef in a large pot (we are not big meat eaters so only do 1 lb. of ground beef).

While meat is browning, slice 1 1/2 large cabbages thinly (keeping strands long). Slice 2 large onions thinly.

Drain most of grease from meat, leaving a bit for flavor.

Add cabbage and onion to meat. Put lid on pot and let cabbage wilt down a little for a few minutes.

Add 1 tsp. sea salt and lots of black pepper, 2-3 T. nutritional yeast, a dash or two of cayenne pepper, onion powder, and some generous splashes of soy sauce or Bragg Liquid Aminos. 

Add 4 cups water, or 2 cups of water and 2 cups stock/broth (which is what we do)

Cover pot with lid and simmer slowly, stirring now and then until cabbage is soft and well cooked, about 30-45 minutes.
 

Thursday, November 21, 2013

Curly Girl Hair

I've always battled my curly hair, which typically would have better been described as frizzy hair. Most of the time I kept my hair in a pony tail or straightened it with a straight iron. Occasionally, only in the winter, I would have a good hair day and wear it down but that's about it.

I've heard about the book Curly Girl by Lorraine Massey but never paid much attention when it was recommended to me as nothing I tried ever worked for my hair before.

When I ran across the book at a thrift store for 10 cents I picked it just to see what all the fuss was about. 
After just two weeks of trying the methods in the book I'm actually loving my hair. I'm embracing the curl and notice hardly any frizz any longer. The below picture is just two weeks after implementing the directions in the book. I expect the "canopy" (the top part of my hair) to continue to get more body.
The idea is quite simple, mainly throw your brush and comb away (and only finger comb in the shower) and stop using shampoo and load up on the conditioner. I did have to modify that part since after several days of only washing with conditioner my scalp was greasy. I had to go back to shampoo but only use it directly on my scalp and not my hair.

The book instructs you on how to style the three different types of curls (corkscrew, Botticelli - the type I have, and wavy).

I'd love to help another curly girl fall in love with her hair by passing my book on to them. If you'd like to win this book write a comment below and I'll draw a name on Tuesday, November 26th.

Saturday, September 28, 2013

Trim Healthy Pancakes

I'm still working on the Trim & Healthy Mama plan. Not every single meal, mind you. I am too exhausted to totally switch up things completely right now. It's mind boggling how exhausting grieving is, along with caring for three other children when all you want to do is stay in bed. 

We've tried a few recipes that we didn't like. Spaghetti squash instead of spaghetti noodles were not a hit. The Broccoli Cheese Soup wasn't great either. One absolute hit was the Trim Healthy Pancakes (an E meal). We enjoyed these more than traditional pancakes and I could eat these several times a week! 
Place one cup of Old Fashioned Oats into blender and blend into a powder. Add 1 cup egg whites and 1 cup low-fat cottage cheese. Add 2 tsp. baking powder, 2-3 tsp. Truvia, and a dash of vanilla (I just added a few drops of NuNaturals stevia vanilla mix. Blend well.

Heat nonstick griddle or pan to medium temperature. Spray with a bit of oil or slight amount of butter. Ladle mix onto skillet and spread batter out a bit. Once bottom is golden brown and bubbles appear on top, flip and brown other side. 

You are allowed to have 1/3 of this batter, so about three average size pancakes. This was plenty to fill me up. Instead of butter or syrup I topped them with plain yogurt and thawed berries. These were delicious and both Becca and Joe came back for seconds and thirds!


Friday, September 20, 2013

Trim Healthy Mama

I have heard a lot about the book Trim Healthy Mama by Serene Allison and Pearl Barrett. All of it was positive. I hesitated at the $35 price tag because I never pay that much for a book! At over 500 pages I knew it was a wealth of information though. Finally, I saved enough Swagbucks up that I was able to purchase an Amazon gift card to help pay for it.
It arrived yesterday and I dug right in. This book is not about another fad diet or eliminating huge groups of food. It's just about eating sensibly.

The basis is that our primary fuel sources are fats and glucose but that both should not be eaten all in the same meal. That if you stick to one or the other you body can burn through that one fuel and then attack your fat afterwards. The book goes into much more detail on it but basically, you can mix and match your meals throughout the day but there is Satisfying meals and Energizing meals to choose from (better known as S or E meals). 

I flipped through the recipes and loved what I saw - new recipes that sounded doable and yummy! I started the change today and hope to see how it goes for one month. I haven't been starving and have been quite satisfied. 

For breakfast I had two simple fried eggs and a cup of coffee (S meal)

For lunch I had two pita breads with tuna and mayo (S meal)

For supper I made a simple side salad and Fooled Ya Pizza (from their cookbook). The picture below does not do it justice (I snapped it while holding a baby and two hungry children hovered at my elbow!). 

You'll never believe that pizza crust is not made with flour but rather CAULIFLOWER! Yep, I thought it sounded disgusting at first but figured I may as well put one of the weirdest recipes to the test.

Steam 16 oz. bag of frozen cauliflower. Drain in colander and press out as much of water as possible. Put cauliflower in food processor (I had to use a blender as that is all I have) and pulse a few times. You want about rice sized pieces.

Add 3/4 c. egg whites and pulse a couple more times. Add 2 cups shredded mozzarella cheese, pinch of salt, dash or two of Italian seasoning, and a little onion and garlic powder. Mix ingredients with spatula inside food processor.

Line a large cookie sheet with parchment paper and grease this as well. Plop entire mixture in middle of cookie sheet and spread outwards on pan. The crust is better thin but don't let edges become wispy thin or they get too dark when cooked.

Bake at 450 degrees for 20 minutes. Cool crust and then top with sauce, your choice of toppings, and a little more mozzarella (not a lot since there is lots in the crust). Broil until toppings are done.

This was quite easy! You cut it in small pieces since it is kind of floppy (I find it to be best eaten with a fork, not your hands). I fed it to my family and only asked afterwards how they enjoyed it and they all said it was good. Hubby even liked it...and he is picky! I then told them it was a cauliflower crust and they didn't believe me!
To me it tastes a bit like an underdone pizza crust (which is that way we like it). Next time I will spread it a little thinner and see if it bakes up crispier but either way this will be on the menu often. I always feel so bloated after eating lots of pizza but just felt satisfied after this meal. It's a great way to sneak vegetables into picky kids as well!

Have you heard of Trim Healthy Mama before? Tried their plan? What do you think?
 

Sunday, May 19, 2013

Coconut Oil

We love our coconut oil! For the past two years we have used coconut oil for popping popcorn as well as for health and beauty issues (homemade deodorant, chapped lips).

It's only been recently that we have switched over from vegetable and canola oil (I will not use these oils at all any more!) and have gone to the good oils: olive oil, safflower oil, and especially coconut oil. The health benefits are amazing and it can stand high temperature frying. We use this for everything from popping popcorn to frying up our taco shells. I go through at least a jar a month!

I was honored when Tropical Traditions wanted to host a review and giveaway on my blog. I was sent a 32 oz. jar of their Gold Label Virgin Coconut Oil. I had been using the Tropical Traditions cold-pressed coconut oil but had never tried the Gold Label. The gold label has more of a coconut taste and smell and we love this much more than the cold-pressed coconut oil. It works great for all our cooking/baking/frying needs and also is wonderful for our health and beauty needs.

Want a chance to win a 32 oz. bottle of their Gold Label Virgin Coconut Oil? Use the form at the end of the post to enter!
Gold Label Virgin Coconut Oil - 32 oz.Win 1 quart of Gold Label Virgin Coconut Oil!
Tropical Traditions is America’s source for coconut oil. Their Gold Label Virgin Coconut Oil is hand crafted in small batches by family producers, and it is the highest quality coconut oil they offer. You can read more about how virgin coconut oil is different from other coconut oils on their website: What is Virgin Coconut Oil?
You can also watch the video they produced about Gold Label Virgin Coconut Oil:

Tropical Traditions also carries other varieties of affordable high quality coconut oil. Visit their website to check on current sales, to learn about the many uses of coconut oil, and to read about all the advantages of buying coconut oil online. Since the FDA does not want us to discuss the health benefits of coconut oil on a page where it is being sold or given away, here is the best website to read about the health benefits of coconut oil.

 
a Rafflecopter giveaway Disclaimer: A 32 oz. jar of coconut oil was given to me in exchange for an honest review.


Monday, February 25, 2013

Homemade Deodorant


My husband developed an allergic reaction to store bought deodorants last year. We tried some natural deodorants on the market but those too seemed to cause a rash and discomfort.

I researched making our own and came up with the simplest recipe to try. It's been a month and working great but the true test will come during the hot summer months.

Using coconut oil and tea tree oil means that there are a lot of antibacterial components in this deodorant. If you are wanting a more feminine scent you may want to switch the essential oil to lavender or your other favorite scent.

You will need:
*Coconut oil
*baking soda
*Tea Tree oil (or other essential oil)
*small container (I washed and reused a small jar that once held a sample of curl crème for your hair)

Depending on the size of your container, melt a corresponding amount of coconut oil in a bowl in the microwave. Stir in several sprinkles of baking soda. Mix in a few drops of essential oil. Pour into container and let sit until hardened. 
 
That is all there is to it! When it's time to use it just scoop out a small amount with fingers and rub under your arm. In the winter it may be more difficult to scoop out but in the summer it will be a softer consistency.

If I ever get an empty plastic deodorant container (the push up type that you buy in stores) I may try to make our own push up deodorant as that should be a lot easier to apply.  

Linking up with Clever Chick Blog Hop today!
 

LinkWithin

Related Posts with Thumbnails